Customization Services
 Photo
Retouching Services
Photo
Retouching Services Live
Support
Live
SupportPlanning a funeral can feel overwhelming — not just emotionally, but logistically. Between choosing readings, organizing the service, and managing guests, it’s easy to overlook small details that make the day feel complete. One of the simplest ways to stay organized is by using a funeral planning checklist, especially one focused on the printed materials that guests will see and hold.
These tangible items — programs, memorial cards, thank-you notes, and keepsakes — become part of how we remember and honor someone’s life. Creating them doesn’t have to be complicated or expensive. With editable Microsoft Word templates, you can design and print professional materials at home or through a local printer, saving both time and money.
This guide walks you through each item you may want to include in your funeral materials, along with thoughtful tips on timing, design, and how to make the process easier.
Why a Printable Checklist Matters
In the midst of grief, even simple decisions can feel heavy. A structured checklist helps families move through the process calmly, one task at a time. It also ensures no important item — like printing the final program or including thank-you notes — is left to the last minute.
Unlike many online checklists that focus solely on logistics (flowers, venue, catering), this one is dedicated to everything printed — the designs and materials that guests will keep long after the service ends.
Printable materials do more than organize information; they preserve memories. They’re something people hold, read, and tuck away. Whether you’re designing a funeral program, creating memorial bookmarks, or sending out thank-you cards, each piece plays a role in honoring your loved one’s story.
If you’d like a detailed walkthrough on crafting the main program, see our related post, Funeral Program Etiquette: Dos and Don’ts, which offers guidance on tone, wording, and respectful presentation.
Checklist Overview: What You’ll Need
Here’s an overview of the key printed items most families prepare. We’ll go into detail for each in the next sections.
- Funeral Program or Order of Service – Includes the ceremony outline, photos, and tributes.
- Memorial Cards or Bookmarks – Keepsakes guests can take home.
- Thank-You Cards – Sent afterward to express gratitude for condolences or attendance.
- Photo Boards or Collage Sheets – Visual displays celebrating moments from life.
- Guest Register Pages – Optional printed pages to record attendance or messages.
- Signage or Directional Prints – Optional materials for venue guidance or poem displays.
Each of these can be made from a Microsoft Word template available in our funeral program shop, where designs match across different formats so you can create a cohesive set.
A Note on Templates and Keepsakes
One of the best ways to save time (and avoid expensive rush orders) is by using editable templates. These allow you to personalize everything — name, date, text, photos — without hiring a designer.
All of our templates are multipurpose. That means they can be repurposed later for:
- Memorial anniversaries
- Digital remembrance PDFs
- Framed keepsakes for family members
If you’re unsure which design suits your needs, our article on Funeral Program Layouts: Single, Tri-Fold & Graduated explains the differences clearly and helps you choose the right style for your timeline and printing setup.
Preparing Your Photos
Before adding photos to your printed materials, review their clarity and quality. A photo that looks fine on a phone may print blurry or dark. Check that:
- The face is well-lit and clear.
- The background isn’t distracting.
- The file size is large enough (preferably over 1 MB).
If your only photo is old or worn, we can help. Our Photo Restoration Services can remove creases, brighten faded tones, and prepare the image for printing so your loved one is remembered as they truly were.
For quick guidance, you can also read our post on Funeral Program Photo Quality, which explains why some photos print duller than expected and how to fix them before you design.
Printed Materials & Templates for the Service
Printed materials are the foundation of every meaningful funeral or memorial. They set the tone, guide attendees through the service, and serve as personal mementos for family and friends. Whether you’re preparing a simple two-page program or a complete printed set, the goal is the same: create something heartfelt, organized, and timeless.
The good news is that you don’t need graphic-design experience or expensive software. All of these items can be made quickly with editable Microsoft Word funeral templates, available in our template shop. Let’s walk through what each printed item should include and how to bring them together into a cohesive set.
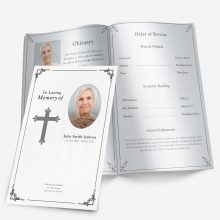
1. The Funeral Program: The Heart of the Ceremony
A funeral program (also called an order of service or memorial program) is the centerpiece of your printed materials. It provides structure for the ceremony and offers guests a small keepsake afterward.
What to Include
- Cover photo and full name
- Dates of birth and passing
- Opening message, poem, or quote
- List of songs, readings, and speakers
- Acknowledgment or thank-you note from the family
- Pallbearers or honorary roles
Our Funeral Order of Service Guide gives a step-by-step breakdown of how to organize these sections clearly inside your chosen layout.
2. Choosing the Right Layout
Different fold styles determine how much information you can include and how formal the final program will feel.
- Single-Fold Program: Quick to print, perfect for shorter services.
- Tri-Fold Brochure: Provides space for photos or multiple readings.
- 4-Page Graduated Template: Our most popular style — tabbed sections help readers follow along easily.
If you’re unsure which design suits your needs, our Funeral Program Layouts: Single, Tri-Fold & Graduated guide explains the differences and paper sizes for home or print-shop use.
Every template in our shop is fully editable in Microsoft Word — simply replace the placeholder text and insert your own photo.
3. Font and Color Selection
Fonts quietly set the emotional tone of your program. Elegant serif fonts (like Garamond or Georgia) feel traditional; clean sans-serifs (like Arial or Calibri) feel modern and simple.
Use no more than two fonts per program and keep colors subtle — black, dark gray, or soft navy for text, with muted accent colors that complement your design.
Our article Funeral Program Fonts in Word provides examples of harmonious pairings that print clearly on both home and professional printers.
4. Integrating Photos Beautifully
The featured photo is often what people remember most. Choose a bright, centered image that reflects your loved one’s personality. Avoid overly dark or distant shots, and test-print one copy before finalizing.
If your image is faded, discolored, or torn, our Photo Restoration Services can professionally correct lighting, remove creases, and enhance color so the final print looks natural and vivid.
For a detailed guide on image clarity and resolution, see Funeral Program Photo Quality Guide.
5. Adding Inserts & Prayer Cards
In addition to the main program, many families include smaller printed pieces:
- Poem Inserts with a favorite verse or prayer.
- Photo Bookmarks guests can keep inside a Bible or book.
- Memorial Cards featuring the same design theme as the program.
All of these can be created from the same editable template, ensuring a consistent look. For layout inspiration, visit Funeral Program Ideas: Creative Ways to Add Meaning.
6. Managing Your Timeline
Printed materials often come together in just a few days — but starting early reduces stress.
Recommended Timeline:
- Day 1: Choose design & gather photos/text.
- Day 2: Edit and proofread the program.
- Day 3: Test-print one copy and finalize.
If you’re on a short deadline, our Same Day Funeral Program Sprint article shares practical ways to prepare everything in 24 hours.
For a broader perspective on timing, check out Funeral Program Timeline: How Long It Takes.
7. Printing Tips for Best Results
Use 28 to 32 lb matte paper for a smooth, professional texture. Glossy paper can cause glare under lighting. Print in “Best Quality” mode for sharp images, and if printing double-sided, select Flip on Short Edge so pages align correctly.
If you plan to print a large batch, local office-supply stores can often finish programs the same day — just bring your saved PDF.
Keepsakes, Thank-You Cards, and Memory Items
Once the main funeral program is complete, many families turn their attention to the smaller details — the personal touches that turn a service into a lasting memory. These printed pieces may seem secondary, but they often become the ones people keep the longest.
From memorial cards and bookmarks to thank-you notes and framed tributes, each item plays a gentle but powerful role in remembrance. The good news is that they can all be designed using the same Microsoft Word templates that you used for your funeral program, creating a consistent, elegant theme throughout.
1. Memorial Cards and Bookmarks
Memorial cards — also called keepsake cards or in-memoriam cards — are small, portable tokens that guests can take home. They’re typically about the size of a postcard or bookmark and feature a photo, a short message, and a favorite verse or quote.
These keepsakes work especially well when you have limited space in your main program. You can print a few extra photos or highlight a special poem without crowding the main layout.
What to include:
- A favorite photo or smiling portrait
- Full name and service date
- Short prayer, quote, or thank-you message
- Optional decorative background or motif
You can personalize them to match your main design — for example, if you used a floral or waterscape template for the program, choose a matching bookmark or card layout from our template shop.
For examples of short, heartfelt tributes you can include, visit our guide on In Memoriam Examples: Short Tributes & Messages.
2. Thank-You Cards
After the service, many families choose to send a brief note of appreciation to those who attended, sent flowers, or offered support. While it’s not required, it’s a meaningful gesture that provides closure and connection.
These can be printed at the same time as your programs, using matching fonts and colors for a unified look. You can even use a small photo of your loved one on the front or inside flap.
Recommended timing:
- Send within 2 to 4 weeks after the service.
- Keep wording simple and sincere — a personal sentence or two is enough.
Our post on Funeral Thank-You Message Templates provides examples for every situation, from clergy and caregivers to close friends and coworkers.
Because these cards often accompany donations or flowers, many families keep one blank copy as part of their keepsake set — a final printed reflection of gratitude.
3. Framed Prints and Photo Collages
Not every printed item is handed out at the service. Some families like to create display pieces — framed photos, printed collages, or tabletop easel prints that celebrate their loved one’s life story.
You can easily adapt your existing funeral program template for this purpose. Simply remove the text blocks and arrange multiple images in a clean grid or photo-collage layout.
If you’re working from older or damaged images, our Photo Restoration Service can help enhance quality, brighten faded tones, and remove unwanted backgrounds so that every photo looks as vivid as you remember.
You can also learn creative display ideas from our post Celebration of Life Program Ideas, which explores ways to personalize printed materials for joyful remembrance.
4. Digital Keepsakes and Sharing
While printed items are tangible, it’s also comforting to have a digital copy to share with distant relatives. After designing your program or card in Microsoft Word, save it as a PDF file to email or upload to a family drive.
You can even create a digital memory folder containing:
- The restored photos
- The final program and thank-you cards
- A copy of any readings or music playlists
This simple step ensures your design remains preserved long-term and can be re-used later for anniversaries or future remembrance gatherings.
For inspiration on creating a timeless tribute that can be shared both in print and online, see our Digital Funeral Program Guide.
5. Keepsake Ideas Beyond the Service
Here are a few creative ways families repurpose printed materials after the ceremony:
- Frame the front page of the funeral program beside a favorite photo.
- Create a scrapbook combining the obituary, printed cards, and messages from guests.
- Print miniature versions of the program for grandchildren or relatives overseas.
- Use the same Word template later for an anniversary memorial or celebration of life event.
Because our templates are fully editable, you can simply change the date or heading and reprint new versions whenever needed.
Printing Tips, Budget & Final Timeline Checklist
By now, you’ve selected your program design, prepared photos, and planned matching keepsakes.
The final step is bringing everything together in print — making sure colors, paper weight, and timing come together smoothly.
Even the most beautifully written program can lose impact if it’s printed on thin paper or the margins are misaligned. Fortunately, a few simple print guidelines can help you avoid those common issues.
1. Choosing Paper & Finish
Paper weight has a big effect on the overall feel. Lighter paper can look informal, while heavier stock adds elegance and durability.
Recommended for programs:
- Weight: 28–32 lb matte paper (or 90–120 gsm if outside the U.S.)
- Finish: Matte for easy reading under indoor lighting; avoid glossy because it reflects light and can smudge ink.
- Color: Bright white for crisp text, or soft ivory for a warmer tone.
For deeper detail on layout safety margins, bleed, and orientation, see Printing a Program Template: Best Practices for Clear Results.
2. Home Printing vs Professional Printing
Both options work well — your decision depends on time, quantity, and budget.
| Option | Pros | Cons |
|---|---|---|
| Home Printing | Instant control, cost-effective for small batches | Color may differ from screen, paper feeding issues |
| Local Print Shop | Professional finish, fast cutting and folding | Slightly higher cost; allow time for proof approval |
If you’re printing at home, print one test copy first to confirm margins and tones. Then print in batches of 5–10 for consistent results.
3. Budget-Friendly Planning Tips
Printing doesn’t have to be costly. Here are a few ways to keep expenses manageable:
- Use templates instead of custom designers. A template from our shop costs a fraction of what graphic designers charge and can be reused later.
- Choose standard paper sizes (8.5 × 11 in). Avoiding custom sizes means lower printing fees and easier replacements.
- Print double-sided. Cuts paper usage in half while keeping the program compact.
- Bundle your print items. Programs, thank-you cards, and memorial cards can all share the same color palette and fonts to save ink and time.
For more savings and formatting advice, check out DIY Funeral Program Guide — it covers the full setup process from Word editing to folding.
4. Coordinating Design Across All Materials
Keeping consistency between the program, cards, and thank-yous creates a polished look.
Use the same:
- Header font (see Funeral Program Fonts in Word)
- Accent color throughout (your template’s floral or scenic theme)
- Photo border style (thin white or soft drop shadow)
When everything matches, guests can easily tell each piece belongs to one coordinated tribute.
5. Recommended Timeline
Below is a general three-day to one-week plan that balances creative work and rest time:
| Stage | Task | Suggested Timeframe |
|---|---|---|
| Day 1 | Choose template and collect photos/text | Morning |
| Day 2 | Draft and edit in Word; add order of service | Evening |
| Day 3 | Proof and test print; adjust fonts & colors | Next day |
| Day 4 | Print full batch of programs and cards | Morning |
| Day 5–6 | Fold, assemble, and bundle materials | Day before service |
If you’re short on time, see our Same Day Funeral Program Sprint guide for 24-hour turnaround instructions.
6. Final Checklist Summary
Below is a condensed overview of what we’ve covered in this four-part guide. You can copy or print this table to keep beside your computer while planning.
| Category | Item | Linked Resource |
|---|---|---|
| Main Program | Funeral program layout + order of service | Funeral Program Order of Service Guide |
| Photos | Restore and prepare main portrait | Photo Restoration Services |
| Inserts | Poems and prayers | Funeral Program Ideas |
| Keepsakes | Memorial bookmarks and cards | In Memoriam Examples |
| Thank-Yous | Printed cards after service | Thank-You Message Templates |
| Printing | Paper weights & settings | Printing a Program Template |
Closing Reflection
A funeral program is more than paper — it’s the story of a life told through words, images, and design. Using editable Microsoft Word templates lets you create professional-looking materials at your own pace, even during a difficult time.
Whether you’re planning today or preparing ahead for a loved one, these checklists, templates, and guides help you build something that feels personal, beautiful, and lasting.
For ready-to-edit designs, visit our Funeral Program Shop or explore our Photo Restoration Services to make your photos look their best before printing.
Frequently Asked Questions
Q1: What should be included in a funeral planning checklist?
A complete checklist includes printed materials such as the program, memorial cards, thank-you notes, and keepsakes—plus time for printing and photo preparation.
Q2: Can I make a funeral program myself?
Yes. You can easily create one using editable Microsoft Word templates from our funeral program shop, with space for photos, poems, and the order of service.
Q3: How far in advance should I print funeral programs?
Ideally 2–3 days before the service. This allows time for proofreading and test prints. See our Funeral Program Timeline Guide.
Q4: What kind of paper should I use for printing?
Matte paper between 28–32 lb provides a professional finish without glare. Learn more in our Printing a Program Template Guide.
Q5: What are funeral keepsakes?
Keepsakes include bookmarks, cards, or framed prints given to guests or family as lasting mementos. You can match them to your chosen program design.
Q6: Do I need a designer for funeral materials?
No. Our Microsoft Word templates make it simple to create professional, coordinated designs quickly and affordably.
Q7: Can old or damaged photos be restored for a program?
Absolutely. Our Photo Restoration Services can brighten, repair, and prepare photos for high-quality printing.
Q8: When should I send funeral thank-you cards?
Within two to four weeks after the service. Find sample messages in our Thank-You Message Templates.
Q9: How do I choose fonts for funeral materials?
Use one or two readable fonts with soft colors. Our Funeral Program Fonts Guide offers clear examples that print well.
Q10: Can funeral templates be reused for memorial anniversaries?
Yes. All templates from FuneralPamphlets.com are multipurpose and can be adapted later for memorial events, framed prints, or digital keepsakes.
Ashley Giddens is the editor at FuneralPamphlets.com and your first point of contact for support. Since 2013, she’s helped families create clear, print-ready memorial programs—editing wording, fixing layouts in Microsoft Word, restoring photos, and customizing templates so they print correctly the first time. Ashley reviews every guide for clarity and printer specs (paper size, margins, image resolution) and updates articles as formats change. Need help? She handles customer service directly and can make quick edits to your file when you’re short on time.