Customization Services
 Photo
Retouching Services
Photo
Retouching Services Live
Support
Live
SupportRestored photos make a funeral program feel clear, dignified, and personal—even when the originals are faded, scratched, or taken decades ago. This guide walks you through scanning old photos, doing beginner-friendly repairs, placing images in Microsoft Word without losing quality, and printing with confidence. Customs vary by faith and region, so if you’re unsure about editing choices (such as colorizing a black-and-white image), confirm with the officiant and family first.
Start with the right scan
A careful scan does more for quality than any edit that follows. Spend five extra minutes here and you’ll save thirty later.
Prepare the photo and scanner
- Gently dust the photo with a clean microfiber cloth.
- Clean the scanner glass and let it dry to avoid streaks.
- Disable any heavy “auto enhance” options—those can crush shadows or oversharpen edges.
Choose the correct resolution (DPI)
- As a rule of thumb, aim for 300 DPI at the final print size.
- If you’re enlarging a small original, scan higher so you maintain detail at print size:
- Wallet (2×3 in): 600–1200 DPI
- 4×6 or 5×7 in: 300–600 DPI
- 8×10 in or larger: 300 DPI (higher only if the original is very sharp)
Color and file format
- Scan in 24-bit color (even for black-and-white photos) to capture subtle tones.
- Save a master copy as TIFF or PNG (lossless). Work from a duplicate; export JPGs only if needed for email.
Keep borders and edges
- Include a little of the photo’s border during the scan. It’s easier to straighten and crop precisely later.
If you don’t have a flatbed scanner
Phone scanning apps are acceptable for quick turnarounds. Use these tips to maximize quality:
- Shoot in bright, indirect light; avoid glare and shadows.
- Place the photo on a neutral, non-reflective surface.
- Hold the camera parallel to the photo (no tilt), and fill the frame.
- Take multiple shots and pick the sharpest one. Export at the highest resolution the app allows.
Quick scan settings by photo size
- Using the photo at the same size: 300 DPI
- Enlarging up to 2×: 600 DPI
- Heavy crops or very small originals: 600–1200 DPI
When in doubt, scan higher once rather than rescanning later.
Organize your files from the start
Create a simple folder with subfolders like 01_Scans, 02_Working, 03_Final_PDF. Name files clearly: Lastname_Firstname_Year_location_scan.tif. Keeping originals untouched lets you revert if an edit goes too far.
DIY or professional help?
Most families can handle basic fixes—straightening, contrast, dust cleanup—especially if the final print size is small. Consider bringing in help when:
- The photo is torn, stained, cracked, or heavily faded.
- You’re trying to enlarge a small original for a full-page cover.
- You’re under tight time pressure and can’t iterate on test prints.
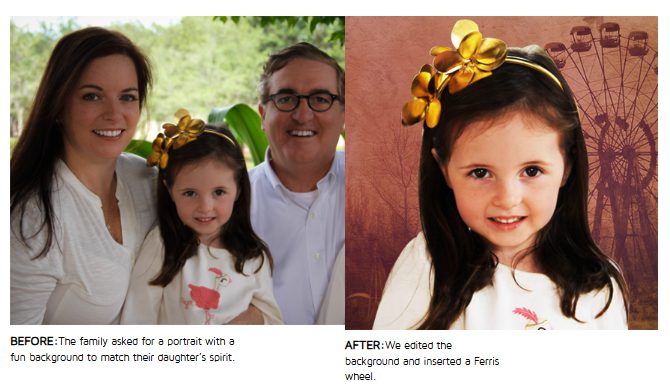
Short on time or working with severe damage? Our photo restoration and editing service can return a clean, print-ready portrait you can drop straight into your Word layout.
Beginner repair workflow (simple, respectful)
You can improve most photos with a short, consistent workflow. Make edits in light passes rather than heavy, one-click filters.
1) Crop and straighten
- Rotate until horizons and door frames look natural.
- Keep a small margin around the subject to avoid cramped layouts.
2) Levels and contrast
- Lift faded midtones and deepen soft blacks to regain shape in faces.
- Avoid over-brightening highlights—skin should keep texture.
3) Dust, scratches, and small marks
- Zoom in 200–300% and dab away specks with a healing or clone tool.
- For patterned backgrounds (like fabric), sample nearby texture so repeats don’t look obvious.
4) Gentle color correction
- Remove color casts (e.g., orange or green).
- Keep skin tones natural; compare against neutral whites or grays in the scene.
5) Sharpening—last and light
- Apply subtle sharpening after resizing to final print dimensions.
- If grain becomes harsh, back off sharpening or convert to clean black-and-white.
Tip: If your program mixes photos from different decades, converting a few images to black-and-white can unify the look and minimize color mismatches from varied sources.
Ethics and consent (brief but important)
Restoration should honor the person and the family’s wishes.
- Label major alterations (for example, if you colorize a black-and-white image or remove a person from the background).
- Confirm with the family before making changes that alter historical details (uniform colors, religious symbols, tattoos).
- Respect cultural and faith practices. If you’re unsure whether an edit (such as removing a sacred object or changing attire) is appropriate, confirm with the officiant first.
Place restored photos in Microsoft Word without losing quality
Word can preserve excellent image quality if you set it up correctly. A few default settings—like image compression—can quietly soften details, so lock these in before you place the file.
Turn off compression and set high fidelity
- Open your DOCX.
- Go to File → Options → Advanced → Image Size and Quality.
- Check Do not compress images in file.
- Set Default resolution to High fidelity (or 220–300 ppi).
Insert at the size you intend to print
- Use Insert → Pictures (avoid pasting from the clipboard).
- With the photo selected, open Picture Format → Size and enter width/height in inches.
- Target ≈300 PPI at print size. A quick way to think about it: if your scan is 2400 px wide and your cover area is 8 inches wide, 2400 ÷ 8 = 300 PPI (perfect). If the math comes out under 200 PPI, shrink the photo’s print size or pick a layout that uses a smaller image area.
Keep proportions and edges clean
- Maintain aspect ratio (lock proportions) to avoid stretching faces.
- Keep important features at least 0.25 in from folds and trim edges.
- Avoid placing tiny text over photos; if you must, set a subtle white box behind the text for contrast.
Use consistent styling
- Apply the same border radius or stroke width across all photos.
- Align tops or centers for a calm, readable page.
- For collages, limit yourself to 2–3 column widths and consistent spacing (⅛–¼ in gutters).
Export a crisp PDF
- Go to File → Export → Create PDF/XPS.
- Choose Standard (publishing online and printing) (not “Minimum size”).
- Open the exported PDF and zoom in to check hairlines and fine textures; nothing should look blocky or smeared.
If you’re new to arranging panels, this walkthrough focuses on the fundamentals you’ll use here: create a funeral program in Word.
Sizing and resolution cheatsheet (quick math you can trust)
Use this table to decide how large a scan can print at ~300 PPI without looking soft. (You can stretch a little beyond these, but test-print first.)
| Scan width (pixels) | Safe print width at ~300 PPI |
|---|---|
| 1800 px | 6.0 in |
| 2100 px | 7.0 in |
| 2400 px | 8.0 in |
| 2700 px | 9.0 in |
| 3000 px | 10.0 in |
If you must print larger than the table suggests, try one or more of these:
- Choose a layout that uses a smaller photo area for the same page size.
- Convert to black-and-white to downplay color noise and grain.
- Use a matte paper to reduce the visibility of minor softness.
For deeper numbers and pixel targets by paper size, see photo resolution for printing.
Layout decisions that protect detail
You don’t need a complex design to make photos shine. Keep choices simple and deliberate.
Covers
- One strong portrait beats a busy collage on the front.
- Leave negative space for the title; avoid placing type over the subject’s face.
- If the portrait is slightly soft, print it smaller on the cover and reserve larger images for inside spreads.
Inside spreads
- Pair a full-width photo with a short caption or quote.
- Avoid edge-to-edge tiling. Let images “breathe” with margins and equal spacing.
- Keep any decorative graphics light; heavy overlays and textures can reduce perceived sharpness.
Photo sequences
- Tell a story chronologically (childhood → milestones → recent years).
- Keep stylistic consistency: either all color or all black-and-white on a given spread.
Captions, credits, and respectful labeling (copy-ready)
Use short, matter-of-fact captions. Save long stories for the eulogy or an album.
- “{{Name}} at {{place}}, {{year}}.”
- “{{Name}} with {{Family member}} at {{occasion}}.”
- “{{Name}} enjoying {{hobby}}.”
If you made significant repairs or colorization, a subtle credit line is transparent and respectful:
- “Photo restored from family original; used with permission.”
- “Colorized from a black-and-white original at the family’s request.”
Print choices that preserve clarity
Paper and finish affect how fine detail appears—especially for older scans.
- Stock: Heavier stocks (e.g., 80–100 lb cover or 60–80 lb text) prevent show-through behind photos.
- Finish: Matte hides glare and makes soft details look smoother; gloss increases pop but can emphasize noise and reflections.
- Trim safety: Keep faces and code-sensitive details (QRs, if used) well inside the trim; small miscuts are common.
- Proofing: Always print one proof on the actual stock before the full run. Check faces first—eyes and smiles reveal sharpening or noise issues right away.
If you need exact panel measurements and paper options, see paper sizes and printing settings.
Troubleshooting soft or damaged images (fast fixes)
- Still looks blurry after export? Reinsert the original TIFF/PNG, confirm Do not compress images is checked, and re-export as Standard PDF.
- Color cast won’t go away? Neutralize with temperature/tint first, then tweak contrast; compare to neutral whites.
- Dust keeps showing after print? Zoom to 300% and spot-heal specks on cheeks and foreheads; reprint a proof.
- Enlargement looks noisy? Reduce size a bit, switch to matte stock, or convert to black-and-white for a cleaner impression.
Advanced restoration tips (fast wins without pro software)
You can push quality further with a few careful, low-risk edits—no advanced tools required.
Fix perspective and keystone
Old photos are often shot at a slight angle when scanned by phone. Straighten first, then use a simple perspective/“skew” control so rectangular edges (frames, doors) look natural. This prevents faces from appearing stretched.
Even out lighting with local adjustments
Instead of brightening the entire image, add small, soft-edged adjustments to lift only the darker side of a face or tone down a blown-out forehead. Subtle, localized changes look more natural than a heavy global exposure shift.
Reduce noise without plastic skin
Apply a light noise reduction pass, then add a touch of clarity or sharpening only to eyes, hairlines, and clothing edges. If skin starts to look waxy, back off noise reduction and consider printing slightly smaller on matte paper, which hides minor grain.
Tame color casts with neutrals
Use a white shirt, tablecloth, or wall as a neutral reference while adjusting temperature (blue–yellow) and tint (green–magenta). Keep an eye on lips and ears; if they turn too red or too gray, you’ve gone too far.
Unify mixed sources
When photos come from different decades, convert an entire spread to black-and-white or set a gentle, consistent contrast curve for all images in that section. Consistency looks intentional and helps the program feel calm and readable.
Repair backgrounds, not history
It’s fine to remove dust, a coffee stain, or a distracting exit sign. Avoid removing people or significant objects unless the family explicitly requests it and understands the change. When in doubt, ask and label major alterations.
Family review and sign-off (keeps decisions simple)
A quick, transparent workflow prevents last-minute edits and misunderstandings.
1) Pick one hero portrait and 3–6 supporting images
Limit choices so the program doesn’t feel crowded. Aim for one strong cover image and a small set of supporting photos inside.
2) Share low-res proofs for comments
Export small JPEGs or a one-page PDF proof. Ask for specific feedback: “Is this the right cover? Are these three inside photos okay? Any spelling corrections for captions?”
3) Confirm ethical edits
If you colorized a black-and-white photo, removed a background, or softened scars/blemishes, note that plainly and ask for approval. This is especially important when uniforms, religious symbols, or cultural attire are involved.
4) Lock choices and move to print proof
Once the family signs off, produce one print on the intended stock. Check faces first (eyes, smiles) and any repaired areas for halos or repeats. Only then proceed to the full run.
When to re-scan vs. fix in software (quick table)
| Problem you see | Re-scan? | Software fix that usually works |
|---|---|---|
| Overall blur/soft focus | Yes | Re-scan at higher DPI; print smaller if still soft |
| Glare or hard reflections | Yes | Re-shoot in diffuse light; tilt light source, not photo |
| Crooked edges/keystone | No | Straighten + perspective correction |
| Moderate dust/scratches | No | Heal/clone at 200–300% zoom |
| Strong color cast (orange/green) | No | White balance using a known neutral |
| Harsh digital noise after enlargement | No | Light noise reduction; convert to B&W; matte stock |
| Jagged compression artifacts (blocky) | Yes | Re-scan lossless (TIFF/PNG); avoid re-saving JPGs |
If a new scan still looks weak at the required size, consider changing the layout so each photo prints smaller—quality rises quickly as print size drops.
Pre-press checklist (final pass before you print)
- Original scans archived as TIFF/PNG; working files saved separately.
- Edits are light and respectful; any major alterations noted for the family.
- Word settings: Do not compress images on; default resolution set to High fidelity/220–300 ppi.
- Photos inserted via Insert → Pictures and sized by inches (target ~300 PPI).
- Faces, titles, and captions sit ≥ 0.25 in from folds and trim.
- Collages use consistent spacing (⅛–¼ in) and alignment; no text over faces.
- Exported PDF (Standard) looks crisp at 100–200% zoom—no blockiness or halos.
- One test print on the actual paper stock; inspected under venue-like lighting.
- Names, dates, and captions proofed by two people; officiant confirms any sensitive edits.
- Final quantity includes 10–15 extras for keepsakes and late arrivals.
Captions and credits (copy-ready)
Use short, factual lines that support the image without crowding the layout.
- “{{Name}} at {{place}}, {{year}}.”
- “{{Name}} with {{family member}} at {{occasion}}.”
- “{{Name}} enjoying {{hobby}}.”
- “From the family’s collection.”
- “Photo restored from the original print; used with permission.”
If a restored image appears on the back panel, a discreet thanks can add warmth:
- “With gratitude to everyone who shared photos and memories of {{Name}}.”
If time is tight or damage is heavy
Severely torn, stained, or sun-faded photos often need a second pass that’s hard to achieve under deadline. In those cases, consider outsourcing a single hero portrait for the cover while you complete the rest of the program. You’ll preserve the most visible image, keep the schedule, and reduce stress for the family.
Handling tricky originals (quick remedies)
Not every photo comes from a clean album. Use these fast approaches when the original is challenging.
Silvering on old B&W prints
Shiny “mirror-like” patches appear in deep shadows on very old black-and-white photos. Scan at a slight angle to the light (or prop the scanner lid slightly open to reduce mirror glare), then correct contrast gently. Printing on matte stock helps hide remaining sheen.
Sepia photos that print muddy
Keep the sepia tone but lift midtones slightly and add a touch of local contrast around eyes and smiles. Avoid heavy saturation—sepia should feel warm, not orange.
Polaroids and instant film
These often have soft edges and a color cast. Crop to the image edge (or keep the white frame if it fits your design), then apply a calm, consistent tone across a set. Printing them a little smaller preserves their nostalgic look without drawing attention to softness.
Newspaper clippings
Newsprint introduces visible dots (halftone). Scan at 600 dpi, add a very light noise reduction, and avoid heavy sharpening. Consider retyping the text as a readable caption instead of enlarging the clipping.
Group photos
If individuals appear small, don’t enlarge aggressively. Instead, place the group photo modestly on an inside panel and choose a tighter portrait for the cover. Guests value faces they can recognize over large, soft images.
Photos with busy or distracting backgrounds
A discreet background cleanup (softening clutter, removing a sign) is acceptable and often helpful. Avoid removing people or elements with personal meaning unless the family asks for that change explicitly.
Color consistency across a mixed set
You’ll often work with images captured decades apart on different cameras. Aim for quiet consistency rather than perfect matching.
- Pick one “reference” portrait for color and contrast, and bring other images gently toward it.
- Neutral whites and clean blacks keep print results predictable. If the venue has low light, bias slightly toward brighter midtones.
- One filter at most. If you use a mild tone curve, apply it lightly across the set so images feel related.
- Black-and-white unifies quickly. Converting a spread with mixed sources to B&W makes grain less distracting and puts the focus on expressions.
Archiving and sharing (keeps memories safe)
A few small steps protect the work you’ve done and make it easy to share later.
- Save the master scans (TIFF/PNG) in a clearly labeled folder.
- Export a small “family set” of JPEGs for phones and email so relatives don’t have to handle giant files.
- Keep the final program PDF alongside the photos; this becomes part of the family record.
- Write simple captions in a text file (who, where, year) while details are fresh.
- If you plan to share online or via QR in the program, use view-only links and avoid exposing personal contact details.
Quick scenarios and solutions (choose your lane)
If you have under 2 hours total
- Pick one hero portrait for the cover and two supporting photos inside.
- Scan hero at 600 dpi, supporting at 300–600 dpi.
- Do a 10-minute pass: crop/straighten → levels → dust on faces → light sharpen.
- Place in Word, compression off, export Standard PDF, test print one copy.
If you have half a day (4–6 hours)
- Scan a small set at 600 dpi; archive masters.
- Add localized adjustments (lift shadows on faces, tame hot spots), unify tone across the set.
- Build a calm inside spread with consistent gutters, simple captions, and high contrast text.
- Test print on your intended stock; tweak and commit.
If you must enlarge a tiny original
- Scan at 1200 dpi.
- Print smaller than full page (e.g., 3–4 inches wide) to retain clarity.
- Convert to B&W if color noise distracts, and choose matte stock.
If the family wants a collage
- Favor 3–5 photos over many small ones.
- Keep equal spacing (⅛–¼ in) and straight alignment; avoid tilted snapshots unless it’s a deliberate, consistent style.
- Balance one close portrait with a couple mid-distance and one environment shot.
Respectful edits: what’s okay vs. ask first
Usually okay
- Remove dust and scratches, correct color casts, reduce glare, soften clutter in the far background, even out minor shadows on faces.
Ask the family first
- Removing people or personal objects, changing uniforms or religious symbols, colorizing a B&W original, removing scars/tattoos/unique features.
Label if altered
- A short note such as “Photo restored from the original print; used with permission” or “Colorized from a black-and-white original at the family’s request” preserves trust.
Printer handoff and proof plan (stress saver)
Use this short script when emailing your local print shop:
Hello,
We’re printing a funeral program PDF with restored photos on {{paper/finish}}.
• Please print on matte stock (preferred) at the attached PDF’s quality.
• Avoid additional image compression.
• Keep trim consistent; important elements sit ≥ 0.25 in from edges.
Could you produce one proof to test before the full run?
Thank you.
When the proof arrives, check:
- Eyes and smiles first (they reveal over-sharpening or soft focus).
- Skin tones for natural warmth (not gray or overly red).
- Dark jackets and hair for blocked shadows (lift midtones slightly if needed).
- Captions for legibility (11–12 pt minimum, strong contrast).
Final checks and graceful wrap-up
Before you print the full batch, run this quick final:
- Originals safe: Master scans backed up to cloud and a USB drive.
- Compression off in Word; photos inserted via Insert → Pictures and sized by inches.
- Exported Standard PDF looks crisp; no halos, no blocky edges.
- Names, dates, and captions proofed by two people.
- Family sign-off on any visible edits or colorization.
- One extra print for the guest book and 10–15 spares for keepsakes.
If you decide a hero portrait needs extra polish or the original is severely damaged, consider a professional second pass to meet the service date without stress. A focused outsource on the cover image preserves impact while you finalize the layout. For fast help, try our photo restoration and editing service—we’ll return a clean, print-ready image sized for Microsoft Word, typically the same day.
With a careful scan, a light, respectful repair pass, and Word set to preserve image quality, families can produce a clear, dignified program that feels true to the person you’re honoring. Test once on the paper you’ll use, keep edits transparent, and save the masters so these memories stay sharp for the next generation.
FAQ
What DPI should I scan old photos for a funeral program?
Scan at 300 DPI for final print size; use 600–1200 DPI for small originals or enlargements.
Should I scan in color or black-and-white?
Scan in 24-bit color, even for B&W photos; you can convert to black-and-white later.
Which file format keeps quality best?
Save master files as TIFF or PNG. Use high-quality JPG only for sharing by email.
Can I use a phone instead of a flatbed scanner?
Yes—shoot in bright, indirect light, keep the phone parallel to the photo, and export at the highest resolution.
How do I place photos in Word without losing quality?
Insert via Insert → Pictures, size by inches, turn off image compression, then export as PDF (Standard).
What’s the fastest way to remove dust and scratches?
Use a healing/clone tool at 200–300% zoom on faces and backgrounds, then print one proof to check.
Is colorizing a black-and-white photo okay for a funeral program?
If the family agrees. Label major alterations and confirm with the officiant if you’re unsure.
Can a tiny photo work on the cover?
Scan at 600–1200 DPI, print smaller if it’s still soft, consider B&W, and choose matte stock.
What paper shows restored photos best?
Matte stock reduces glare; 80–100 lb cover (or 60–80 lb text) prints photos cleanly.
When should I hire a professional restorer?
For severe damage, tight deadlines, or large enlargements—often just the hero portrait for the cover.
Ashley Giddens is the editor at FuneralPamphlets.com and your first point of contact for support. Since 2013, she’s helped families create clear, print-ready memorial programs—editing wording, fixing layouts in Microsoft Word, restoring photos, and customizing templates so they print correctly the first time. Ashley reviews every guide for clarity and printer specs (paper size, margins, image resolution) and updates articles as formats change. Need help? She handles customer service directly and can make quick edits to your file when you’re short on time.