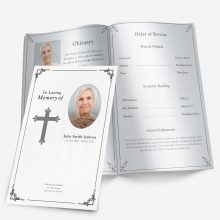
Planning a funeral or memorial service often comes at a time of deep grief, making it challenging to focus on the details. One of the most important pieces is the funeral program, which guides guests through the service and serves as a cherished keepsake. With DIY funeral program templates, families can design something personal and professional without overwhelming costs. Below, we’ll walk through how to create a DIY funeral program step-by-step, while offering resources, examples, and links to helpful guides.
Step 1: Gather Information and Content
Before opening any template, collect the key details you’ll need:
- Basic information: Full name, birth and passing dates, service time, date, and location.
- Obituary or biography: A written tribute to your loved one.
- Order of service: The sequence of readings, music, and eulogies (see our funeral order of service guide).
- Photos: A main cover photo plus additional candid or family photos.
If some photos are damaged or faded, consider our photo restoration service to bring them back to life.
Step 2: Select the Right Template
Choosing the right template is where the personalization begins. Decide on layout and style:
- Bifold programs: Simple and classic.
- Trifold programs: More room for text and photos. For inspiration, see our Tri-Fold Butterflies template.
- Graduated designs: Layered tabs that create a polished, professional look, such as the Floral 8 Graduated 2-Page.
Each design offers flexibility, so it’s important to match the template with the type of content and length of the program you want to create.
Step 3: Customize Wording and Structure
Once you’ve chosen a template, it’s time to customize the wording. Every family has different preferences for tone, but our resource on funeral program wording examples provides ready-to-use samples. You can also explore our full section on funeral program examples & design ideas for inspiration.
Make sure your program includes:
- Welcome or opening message
- Order of service
- Poems, prayers, or scripture
- Acknowledgments and thanks
- Closing details such as burial location or reception
Step 4: Edit the Program Template
After filling in the text, carefully review for errors in spelling, dates, and names. Our guide to editing a program template walks you through how to easily customize using Word or similar software.
To avoid design mistakes:
- Keep fonts simple and readable.
- Align photos neatly with text.
- Use consistent spacing between sections.
Step 5: Plan for Printing
Printing is one of the most crucial steps to ensure the program looks professional. Our guide to printing a program template explains how to set margins, choose the right paper weight, and use the correct settings. For guidance on dimensions, our program sizes & paper guide helps you avoid misprints or awkward formatting.
If you’re handling printing at home:
- Test print a single copy before running the entire batch.
- Use heavier cardstock for a more durable, polished feel.
For professional results, local print shops or online printers can handle bulk orders quickly.
Step 6: Add Extra Touches
Beyond the program itself, some families like to provide matching keepsakes, such as DIY funeral program cards. These are smaller versions of the program or prayer cards that can be handed out or mailed later.
To make your program even more meaningful:
- Include a favorite hymn or poem.
- Add a collage page of family photos.
- Insert a personal note of thanks from the family.
In Summary
Creating a DIY funeral program is about more than just saving money—it’s about honoring your loved one with a personal touch. By following these steps and using our library of guides, you can create something heartfelt, professional, and lasting. Start with our free DIY funeral program template or explore additional designs to find the perfect fit.
FAQ
1) What size and paper work best for a DIY funeral program?
Half-letter and letter bifolds are most common. Use 28–32 lb paper; matte or satin finishes read well in low light.
2) How do I choose between bifold, trifold, and graduated layouts?
Pick based on content length. Bifold suits short services; trifold adds panels for readings; graduated (tabbed) is best when you want clear sections and a keepsake feel.
3) Can I edit a .docx template in Google Docs?
Yes. Upload the file in Google Docs (File → Open → Upload), then replace text and photos. Export as PDF for consistent printing.
4) What DPI should photos be for clear printing?
Aim for ~300 DPI at the final print size. Scan small originals at 600 DPI if you plan to enlarge or crop.
5) Should I print at home or use a print shop?
Home printing is flexible for last-minute edits and small quantities. Use a shop for large runs, heavier stocks, scoring/folding, or color-critical projects.
6) How many copies should I print?
Plan one per guest plus 10–20 extras for family and anyone who couldn’t attend.
7) What’s the difference between program booklets and memorial/prayer cards?
Programs guide guests through the service and include more text; cards are small keepsakes with a photo and a short verse or prayer.
Ashley Giddens is the editor at FuneralPamphlets.com and your first point of contact for support. Since 2013, she’s helped families create clear, print-ready memorial programs—editing wording, fixing layouts in Microsoft Word, restoring photos, and customizing templates so they print correctly the first time. Ashley reviews every guide for clarity and printer specs (paper size, margins, image resolution) and updates articles as formats change. Need help? She handles customer service directly and can make quick edits to your file when you’re short on time.

 Customization Services
 Photo
Retouching Services
 Live
Support
